This article will detail the steps for obtaining an SSL on an NGINX server.
1. Purchase an SSL Certificate from No-IP.
Customers with Enhanced or Plus are entitled to at least, one free No-IP Vital Encrypt DV SSL Certificate. If you need an additional certificate you can purchase one from here. If you need help purchasing your SSL check out this guide.
2. Generate the private key and CSR from the NGINX server by running this command:
(in this example, we use “nginx1-ssl” as the name for the key and csr but you can name your own.)
sudo openssl req -nodes -days 365 -newkey rsa:2048 -keyout /etc/ssl/private/nginx1-ssl.key -out /etc/ssl/certs/nginx1-ssl.csr
3. This will prompt you to fill out the standard info for a CSR, such as country, state, FQDN, etc.
Do not set a challenge password.

4. View the CSR by running this command:
(you would replace nginx1-ssl.csr with the name you provided in step 2)
cat /etc/ssl/certs/nginx1-ssl.csr

5. Add your CSR to No-IP
Copy the CSR, including everything from
-----BEGIN CERTIFICATE-----
to
-----END CERTIFICATE-----
From your No-IP account, Click My Services at the left, then SSL Certificates.
Locate your available certificate and select Add CSR.

Here, you will choose your server type from the drop down menu, paste the CSR we just copied, then click the green Add CSR button to continue.

6. You will now see the section called “SSL Contact Information“.
Fill in the information required. The City, State and Country will be auto-filled from the information generated in the CSR you created. Click the green Confirm button when finished.

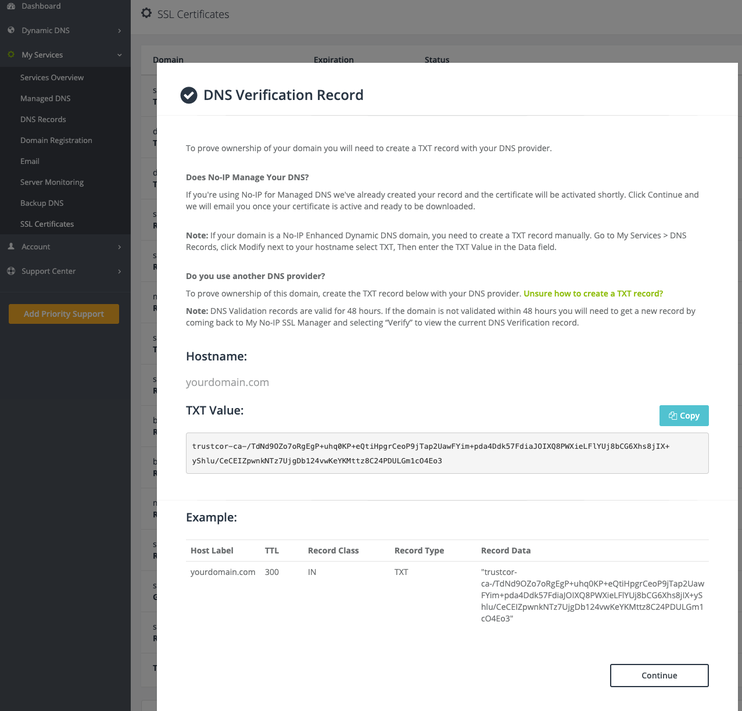
7. Finally, you will see the section called “DNS Verification Record”.
If your domain is registered with us and you have Plus Managed DNS, we will add the DNS Verification TXT record automatically.
If you are an Enhanced user with us, you will need to copy and paste the DNS Verification TXT record to your DNS Records manually.
If your domain is not registered with No-IP, you will need to copy and paste the DNS Verification TXT record to your DNS Records manually at your current DNS provider.
Click the Continue button once you have reviewed and/or copied this information.
8. Wait for Verification. Once your TXT record is created, the SSL should be issued within 30 minutes or less.
If you have not received it within 30 minutes please contact No-IP Support. Until then, the Status will remain in Pending Verification.

After 30 minutes, it should be verified and the Status will change to Active.

9. Download the signed-cert from the No-IP SSL Manager.
You may need the PEM, PEM-CHAIN or other file types, depending on your servers requirements.
From your No-IP account, click My Services at the left, then SSL Certificates.
Find your SSL and click the Download button.

Here, use the dropdown menu to select the file type and click the Download button to obtain the file.

You may need to make server configurations, i.e, enable SSL parameters on listening sockets in the server block, and setting the locations of the server certificate and private key.
While we do not support this level of server configuration, you can find many useful guides on the internet, such as this official NGINX one:
https://nginx.org/en/docs/http/configuring_https_servers.html
As with any changes to NGINX, you may need to restart the server for these changes to take effect.
More Information
Our certificate provider has an extensive knowledge base with instructions on installing your new certificate.